August 29, 2013
August 29, 2013

Temperature Mapping is an intrinsic part of equipment validation. It evaluates the quality and compliant nature of the equipment to ensure the equipment meets the user and regulatory agency’s standards. An autoclave temperature study may feature unique user load configurations and a vent filter SIP cycle. This validation discipline primarily uses Kaye Validator T-type thermocouples or remote temperature sensors (Ellab, DataTrace, etc.) along with biological indicators to provide a biological test complement. The common method to secure the thermocouple/sensor and biological indicator in place is by using zip-ties. But, these thermocouples and sensors come in a variety of sizes and shapes and there is no guarantee that your testing environment will be a perfect fit to these measuring instruments. So what do you do?
A primary load configuration conundrum is how to handle minimal-sized tubing diameter (1/8’’ and smaller). Using tubing adapters is the best solution to this issue. Adapters help enlarge the tubing diameter which allow for greater maneuverability for thermocouple and biological indicator placement. Although the length of the tubing will be altered, the integrity of the tubing should not as long as the adapters are secured to the tubing. A secondary option is to cut a slit into the tubing. This is a plausible solution but comes with the cost of compromising the integrity of the tubing. Sealing the slit with autoclave tape is the most efficient preventative measure yet residual steam will still penetrate the opening. Using a sealant would eliminate the residual steam issue but the sealant takes too long to cure when doing multiple temperature mapping runs to verify successful results. These two methodologies will allow for potential cold spot analysis to occur rather than not.
When dealing with a vent filter SIP or any filter load configuration, one will usually place the measuring instrument at the filter’s core to ensure it receives adequate steam penetration and temperature readings. There are special smart clamps and gaskets for this temperature mapping test to secure the thermocouple or one can use a remote temperature sensors as well. The primary challenge is to secure the biological indicator and thermocouple within the filter core. This can be achieved by wrapping the biological indicator with wire mesh. The addition of wire mesh does not impede steam penetration, but acts as an outer shell to secure the biological indicator in place. In addition, one can place a wire mesh gasket at the base of the filter as additional security measure. The latter option is an effective deterrent when coupled with using remote temperature sensors.
Lastly, another way to combat small spaces is to reduce the size of the biological indicator strip. The caveat for this final tip is that it cannot be used with biological indicator ampoules. Biological indicator strips have an integrity envelope to protect the strip from the environment. This envelope is surrounded with additional surface wrap. This wrap excess can be decreased to allow for the biological indicator to be placed in small confined locations.
Learning Through Trial and Error
During my first set of autoclave mapping tests, I encountered a few load configuration items that failed the biological indicator strip test. My troubleshooting methods had led me to use the adapter and slit method for easy thermocouple and biological indicator placement; however, I did not know about reducing the size of the biological strips. I executed these tests by folding the biological indicator strip repeatedly in order for strip to be as small as possible. By doing it this way, I had unknowingly caused inadequate steam penetration to the strip’s indicator and thus creating a positive spore strip. Fortunately, I was able to be more deliberate and delicate with my biological indicator and thermocouple placement on my re-execution attempt to achieve a negative spore strip result. In hindsight, I would have reduced the size of the surface wrap and placed the thermocouple further downstream of the biological indicator. Plus, I would have connected a longer length on my larger-sized diameter tubing to the fitting adapters to expand the executable volume for steam penetration.
One final thing with autoclave temperature mapping, even if one solves these configuration issues, there is no guarantee that the test will automatically pass. Issues with the chamber’s integrity, poor saturated steam quality, inadequate air removal, insufficient sterilization time can cause thermocouples to read irregular temperature values and yield non-passing biological indicator results. Examine the configuration issues first, but don’t think it is the root cause of the testing discrepancies/failures.
These are only a few of many tips in this field of pharmaceutical commissioning and qualification. Thus by sharing these few tips, I hope you become armed with some potential execution possibilities when faced with challenging autoclave mapping problems.
TAGS: Qualification & Validation Life Science Consulting Commissioning

July 24, 2013
Introduction Risk based approaches to validation of computerized systems have been heavily promoted since the publication of GAMP 5 and ASTM E2500. Yet we continue to see examples of validation...
April 2, 2015
Trying to remain compliant with the current Good Manufacturing Practices (cGMP) has its challenges and opportunities. I would like to discuss the opportunity afforded by the ASTM E2500 "Standard...
December 15, 2015
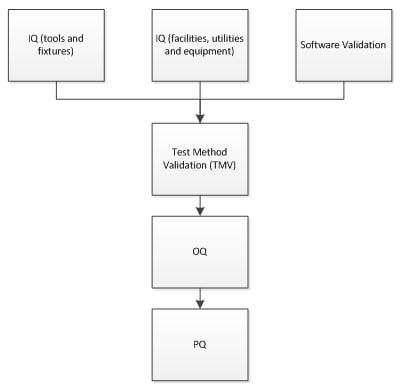
A common principle in Operational Qualification (OQ) studies is to challenge processes under worst case conditions. A "worst case" condition or set of conditions are generally those parameters...